Get LUN id of Raw Disk Mappings with PowerCLI

I had a need to get the LUN id of all of the Raw Disk Mappings for a particular virtual machine running on VMware vSphere. I could see this information within the vSphere Client by editing the setting of the virtual machine, selecting each of the Raw Disk Mapping Hard Disks one at a time and clicking on the Manage Paths button in the bottom right hand corner. The LUN id is then displayed for each path to the LUN in the LUN column, the LUN id is also the last part of the Runtime Name – displayed in the first column, e.g.


This is a time consuming process, especially if you need to perform it for a large number of virtual machines. Also I do not like editing the settings of a virtual machines just to look at the setting as I may accidently change something and forget to click on cancel instead of OK. So I looked at getting this information with PowerCLI.

You can get a list of hard disks the virtual machine has with the following one liner

Get-VM | Get-HardDisk

You can then limit this information to just the Raw Disk Mappings as follows:

Get-VM | Get-HardDisk | Where {$_.DiskType –eq “RawPhysical”}

However the properties returned do not include the LUN id. From the SCSI Canonical Name you can find out the Runtime Name by using the Get-SCSILun command against one of the hosts, of course this should be the host the virtual machine is running on which is returned in the VMHost property from Get-VM. So if I run Get-SCSILun for the SCSI Canonical Name of each of the Raw Disk Mappings I can get the Runtime Name. Then if I use the Substring method on the Runtime Name to strip off the number of L at the end of the Runtime Name, by using the LastIndexof method, I can get the LUNid. The following commands achieve this:

$Disks = Get-VM | Get-HardDisk | Where {$_.DiskType -eq “RawPhysical”}
Foreach ($Disk in $Disks) {
$Lun = Get-SCSILun $Disk.SCSICanonicalName -VMHost (Get-VM ).VMHost
$Lun.RuntimeName.Substring($Lun.RuntimeName.LastIndexof(“L”)+1)
}

Where is the name of the virtual machine you want to get the LUN ids for.

I have put all of this into a script and only run the commands if the virtual machine passed to the script exists, i.e.

Param($VM)

if (Get-VM $VM) {

$Disks
= Get-VM $VM | Get-HardDisk | Where {$_.DiskType -eq
“RawPhysical”}

Foreach ($Disk
in
$Disks) {

$Lun
= Get-SCSILun $Disk.SCSICanonicalName -VMHost (Get-VM $VM).VMHost

$Lun.RuntimeName.Substring($Lun.RuntimeName.LastIndexof(“L”)+1)

}

}

I saved this script in C:\VIscripts as Get-VMLUNid.ps1 and run it as follows: –

C:\VIscripts\Get-VMLUNid.ps1

e.g.

C:\VIscripts\Get-VMLUNid.ps1 sqlsvr01


Posted in PowerCLI, Storage, VMware | 3 Comments

Get NetApp Volume Options with PowerShell

You will need the DataONTap module for Powershell for these commands to work. If you already have the DataONTap modules installed you can load it in your current PowerShell session with the command

Import-Module DataONTap

You will then need to connect to the NetApp filer you want to work with using the command

Connect-NaController

Optionally you can specify a user to authenticate with by specifying the credential parameter, i.e.

Connect-NaController -credential

For example

Connect-NaController NetApp01 –credential root

You can then get a list of the volume options for a specific volume with the command

Get-NaVolOption –Name

For example

Get-NaVolOption -Name vol0

What I was interested in finding out was the value of nosnapdir for all of the volumes on the filer so I used the following one liner

$vols = Get-NaVol ; ForEach ($vol in $vols) {$Results = “” | Select Volume, nosnapdir ; $Results.Volume = $vol.name ; $Results.nosnapdir = (Get-NaVolOption $vol | Where {$_.name -eq “nosnapdir”}).Value ; $Results }

I’m sure there is a way to pipe the input into the ForEach command. I will have to look that up to improve the command line.

I then improved this into a small script that could be used to return the value of any of the volume options for all volumes on the connected filer, as below:

Param([Parameter(Mandatory=$true)]$VolOption)

if ($VolOption) {

$vols
=
Get-NaVol

ForEach ($vol
in
$vols) {

$Results
=
“” | Select Volume,$VolOption

$Results.Volume =
$vol.name

$Results.$VolOption
= (Get-NaVolOption
$vol | where {$_.name -eq
$VolOption}).Value

$Results

}

}

You can then run this script passing a parameter of the Volume Option you want to report on.

Posted in NetApp, Powershell, Storage | Leave a comment

FCP Partner Path Misconfigured Error

If you are receiving FCP Partner Path Misconfigured Errors from your NetApp (or IBM N series) storage you can check with LUNs are being accessed via the partner path by running the lun stats command on the filer with the extended statistics. It is best if you collect the statistics over a few seconds, e.g. by running the command

lun stats –o –i 30 –c 1

The

–o tells the command to display the extended statistics

-i 30 tells the command to collect statistics for 30 seconds, you can use a different amount of seconds here if you wish

-c 1 tells the command to run 1 time, again you can you a different number here to get it to repeat the 30 seconds collection a number of times

If any LUNs were accessed via the partner path over the period you collected the statistics you will be able to see the amount of IOPS and kB transferred in the last two columns before the LUN name, i.e. Partner Ops and Partner kB.

This should help you identify which host may be misconfigured and therefore not accessing the LUNs via the filer they are defined on.

Posted in NetApp, Storage | Leave a comment

ESXi Hosts Becoming Disconnected from vCenter

Recently I have been experiencing problems with ESXi 4.1 hosts becoming disconnected from vCenter.

Right clicking on the host and selecting Connect does not normally fix the problem. Also logging in directly to the host with the vSphere Client usually does not work, or if it does it disconnects quickly after connecting.

All of the virtual machines running on the host continue to run; however without the host being connected to vCenter or being able to connected directly with the vSphere Client you are unable to manage the virtual machines. Also, connecting to the host with PowerCLI does not work, if it does connect it drops the connection soon afterwards.

I have used a variety of “tricks” to get the host to reconnect.

  1. Restart the management agents and then reconnect. If this does not work the first time then try again. I have found that it often works on the second attempt.
    1. From the host console press F2 to login
    2. Enter the root password
    3. Go down to Troubleshooting Options and select it
    4. Select Restart Management Agents
    5. Press F11 to restart the management agents
    6. Once they have been restarted attempt to reconnect the host by right clicking on it within vCenter and select Connect. You will normally get an error message and then prompted to enter a username and password, enter root and the root password.
  2. If the above fails twice then try removing the host from vCenter and adding it in again. This has an impact in that you will lose performance statistics, the virtual machines will need to be put back into the correct resource pools if you are using resource pools and if you are using Site Recovery Manager (SRM) the virtual machine protection will need to be reconfigured. You might want to skip this step and try the ones below first and use this as a last resort.
    1. Right click on the host in vCenter and select Remove.
    2. Once it has been removed right click on the container the host was originally in, e.g. a cluster and select Add host
    3. Enter the host name, root for the username and the root password
    4. If the host starts to add and then fails then repeat the steps in 1 above, again you might have to try the steps in 1 above a couple of time.
  3. If you still cannot get the host to reconnect and you are using Fibre Channel storage then rescan the HBAs. As you cannot manage the host with a vSphere Client you will have to do this at the command line.
    1. At the console, if you are not already in the Troubleshooting Options then follow steps a through to c in 1 above to get to the Troubleshooting Options.
    2. If the menu shows Disable Remote Tech Support Mode then Remote Tech Support is already enabled, if there is an option for Enable Remote Tech Support Mode then select it.
    3. Using a SSH client such as Putty to get a SSH connection to the host
    4. Login as root
    5. Issue the command esxcfg-rescan for each of the HBAs on the host where hba is the hba device, e.g.
      esxcfg-rescan vmhba1
      esxcfg-rescan vmhba2
    6. Now try reconnecting the host by right clicking on it and selecting Connect as described in step 1.f. Again if it does not work then follow the steps in 1 above a couple of times.
  4. If you still cannot get the host to connect check for redundant directories in /var/run/vmware/root_0 and /var/lib/vmware/hostd/stats being full, tidy these directories and attempt to reconnect again.
    1. If you do not already have a SSH connection to the host follow steps a through to d in 3 above to get a SSH connection.
    2. cd /var/run/vmware/root_0
    3. There should be a directory in here for each running virtual machines on the host, issue the following command to get a list of all the directories here.
      ls

      If there are more directories than the number of running virtual machines then use the following command to remove the empty ones, it will attempt to delete the non-empty ones but will fail to delete these, so you are safe to run the command against all directories
      rmdir *

    4. Issue the following command to check for full filesystems.
      vdf

      The one to check is hostdstats, if it is 100% full then tidy it as follows

      1. cd /var/lib/vmware/hostd/stats
      2. rm hostAgentStats-*.stats
    5. Now restart all of the services with
      services.sh restart
      You can run this while there are running virtual machines on the host without affecting them.
    6. Now attempt to connect the host again, as detailed in 1.f.

I have found that if a host becomes disconnected and I have had to use the steps above to reconnect it then it becomes disconnected again within the next 24 hours or so unless the host is restarted. Therefore, I suggest that once you have the host reconnected put it into maintenance mode and restart it.

I think this issue is being caused by NetApp SnapManager for SQL and SnapManager for Exchange because usually the SnapDrive running on one of the virtual machines on the failing host is normally reconfiguring the virtual machine and rescanning the HBAs to attach or detach RDMs from a NetApp snapshot to verify a backup that has just been run by the SnapManager product running on the virtual machine when the host becomes disconnected. I do not think that it is a fault of the SnapManager product as it is just using the VMware APIs to perform the tasks it needs to do. All of the hosts I am having this issue with are running an unpatched version of ESXi 4.1 (build 260247). They are also running from IBM supplied USB keys without the latest IBM customisation. I plan to upgrade the hosts to at least ESXi 4.1 update 1 (build 45697) or ESXi 4.1 update 2 (build 502767) to see if this helps the situation. I will also apply IBM customisation 1.0.4 as this fixes the issue of vMotion and Fault Tolerance becoming disabled following a reboot of the host. I will update this post with details of whether these updates helped or not.

Posted in VMware, vSphere | 5 Comments

Repeating ADAM_VMwareVCMSDS Error Every Minute in Windows Active Directory Web Services Log

I have seen the following error repeat EVERY minute in the Windows Active Directory Web Services Log on Windows 2008 R2 Servers running VMware vCenter 4.1.

“Active Directory Web Services encountered an error while reading the settings for the specified Active Directory Lightweight Directory Services instance. Active Directory Web Services will retry this operation periodically. In the mean time, this instance will be ignored. Instance name: ADAM_VMwareVCMSDS”

To fix this look in the regestry key

HKEY_LOCAL_MACHINE\SYSTEM\CurrentControlSet\Services\ADAM_VMwareVCMSDS\Parameters

for

Port SSL.

If Port SSL is already there as a string (REG_SZ), delete it and create a new REG_DWORD named Port SSL and set the value to 636 (Decimal). You then need to restart the two services “Active Directory Web Services” and “VMwareVCMSDS”. Not sure if both of these services needed to be restarted but I have always done this whenever I notice this error message without impacting anything

I have yet to discover anything not functioning while this error is occurring but it is annoying that it repeats every minute so I always ensure the registry key is correct on new implementations and correct it on any installation suffering from the issue.


Posted in Configuration, Installation, VMware, vSphere | Leave a comment

Using Active Directory Authentication with IBM BladeCenter

To enable an IBM BladeCenter to use Active Directory for Authentication use the following settings: –

Firstly create a group in your Active Directory and add the people who need to access the IBM BladeCenter to this group.

Login to the BladeCenter Management Module

Under MM Control select Network Protocols

Go to the Domain Name System (DNS) section

If DNS is not already enabled it and enter addresses of your DNS Servers, e.g.

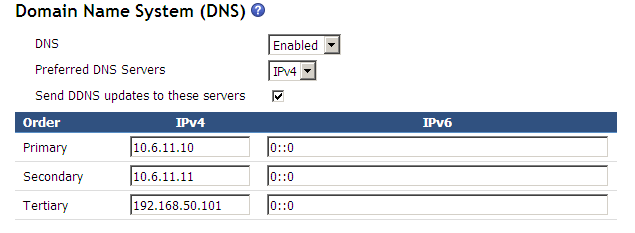
Don’t forget to click on the SAVE button at the end of the Domain Name System (DNS) section. If you have made any changes the n you will need to restart the Management Module.

Now scroll down to the Lightweight Directory Access Protocol (LDAP) Client section

Select “Use LDAP Servers for Authentication Only (with local authorization)

Select “Use DNS to find LDAP Servers

You should be able to leave your Active Directory forest name blank and just enter your domain name, e.g. your-company.local

Under Miscellaneous Parameters you can leave the Root DN blank and select “w/ Login Credentials” for the Binding method

Click on the SAVE button at the end of the Lightweight Directory Access Protocol (LDAP) Client section

Now select “Login Profiles” under “MM Control”

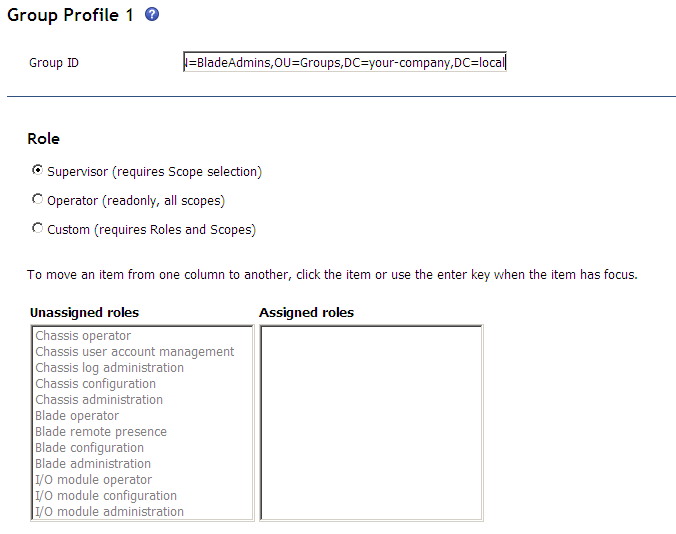
Go down to the Group Profiles section

Click “Add a group”

In the Group ID enter the distinguished name of the Active Directory group you created, e.g. CN=BladeAdmins,OU=Groups,DC=your-company,DC=local.
Note that this is a limit of 63 characters on the distinguished name so if your group is down multiple levels within your Active Directory then you may not be able to use it, e.g. CN=BladeAdmins,OU=ServerTeam,OU=InformationTechnology,OU=UnitedKingdom,DC=your-company,DC=local is going to be too long. You can just use the Common Name of BladeAdmins but this is not going to be as secure as using the distinguished name.

Select the Role for the people in this group. If you just want to try this out so that your Server Administration Team can login using their Active Directory account instead of using the default username then select Supervisor, by default Supervisor will have access to everything on the BladeCenter so you can click the SAVE button at the bottom. See more details below regarding roles.

Finally under “Account Security Management” set “User authentication method” to “Local first, then LDAP”. This will allow you still to be able to use the built in accounts if your LDAP configuration stops working.

No you will be able to login to the BladeCenter Management Module with users listed in the group you have configured. You do not need to enter the domain name, just the userid and password, e.g JohnDoe.

You can configure up to 16 different groups in the group profiles section with varying access. For example you may want a group with full Supervisor Access to everything, the Network Management Team may only require access to the I/O module configuration on the I/O Module bays with Ethernet modules in it, the Storage Administration Team may just need access to the I/O Module bays with Fibre Channel modules in them, and your front line help desk team may just need read access. You limit which blades each group has access to so you may have a team who has access to the email blades and a team who has access to the database blades.

The operator role gives the group read only access, this will not allow the people in this group to be able to use the Remote Control functionality of the blades. To provide a group of users with access to use the Remote Control functionality but not to make changes to the BladeCenter configuration select the Custom role and deselect all roles accept “Blade remote presence”, additional under the scope section you can limit the blades this group has access to by clicking on blades in the Assigned column to unassign them. The “Blade remote presence” role does not allow the user to power on/off the blades, for this functionality also select the “Blade administration” role. The following table details the functionality provided by each of the roles.

Page

Role required to change information or execute tasks

Supervisor

Chassis User Account Management

Blade Server Remote Presence

Chassis Operator

Chassis Administration

Blade Administration

I/O Module Administration

Chassis Log Administration

Chassis Configuration

Blade Configuration

I/O Module Configuration

Monitors

System Status

Event Log (view)

Event Log (clear or set log policy)


LEDs


Fuel Gauge


Hardware VPD


Firmware VPD


Blade tasks

Power/Restart


Remote Control (remote console)


Remote Control (virtual media)


Firmware Update


Configuration


Serial Over LAN


I/O-module tasks

Admin/Power/Restart


Configuration (see Note 1)


Firmware Update


MM control

General Settings


Login Profiles


Global Login Settings


Alerts (see Note 2)


Port Assignments


Network Interfaces


Network Protocols


Security


Configuration File (backup)


Configuration File (restore)


Firmware Update


Restore Defaults (see Note 3)


Restart MM


Notes:

  1. To send ping requests to an I/O module (Advanced Management link in I/O Module Tasks Configuration page), the I/O Module Administration, I/O Module Configuration, or I/O Module Operator role is required.
  2. For the BladeCenter T Management Module, the Supervisor or Chassis Administration role is required to reset filter detection under MM Control Alerts.
  3. For the MM Control Restore Defaults page, both the Chassis Administration and Chassis Configuration roles are required.
Posted in Blade, IBM | 1 Comment

ESXi4.1 vMotion using incorrect vmnic

I have a number of esxi 4.1 update 1 hosts configured as follows: –

vSwicth0 – vmnic0, vmnic1, vmnic2, vmnic 6 – all active
VMKernel Port – Management – enabled for Management – Active vmnic0, Standby vmnic2, unused vmnic1 and vmnic6
VMKernel Port – vMotion – enabled for vMotion – Active vmnic2, Standby vmnic0, unused vmnic1 and vmnic6
VMKernel Port – FT Logging – enabled for FT Logging – Active – vmnic1 and vmnic6, standby vmnic0 and vmnic2

Each VMKernel Port only has the function it is intended for enabled and the other two disabled, i.e. the Management VMKernel port is enabled for Management but has vMotion and FT Logging disabled.

When performing a vMotion and monitoring the physical switch I notice traffic coming out of the source host on vmnic0 and going in to the destination host on vmnic2.  This should be coming out of vmnic2 and going in to vmnic2.  It always does this regardless of the source and destination hosts, e.g. if I vMotion a VM from host01 to host02 traffic goes from vmnic0 on host01 to vmnic2 on host02, when vMotioning the VM back from host02 to host01 it goes from vmnic0 on host02 to vmnic2 on host01.

I have also tried separating vMotion and Management onto different vSwitches but still see the traffic coming out of the vmnic configured for management on the source, e.g.

vSwitch0 – vmnic0 acvtive, vnmic1 standby
VMKernel Port – Management – only enabled for Management

vSwitch1 – vmnic2 active,  vmnic6 standby
VMKernel Port – vMotion – only enabled for vMotion

When I perform a vMotion the vmnic0 is used on the source host and vmnic2 on the destination host.

This is all true when vMotion and Management are on the same VLAN/subnet, this should be a valid configuration.

If I change vMotion to use it’s own VLAN/subnet then the correct vmnic is used on the source host but I should not have to do this.

The minor issue I have with using a separate VLAN/subnet for vMotion and Management is that they both use the same VMKernel default gateway so the vMotion interface is now configured for a default gateway which it can never access!  Not a major issue as the vMotion traffic should never need to leave it’s subnet.  Some environments I have the vMotion interface is being monitored by a monitoring utility and this can not access the vMotion interfaces if the default gateway is not accessible.

Posted in Configuration, VMware, vSphere | 2 Comments

Storage vMotion taking twice as long when block sizes do not match

While trouble shooting performance issues at a customer I noticed in esxtop that the MB written/s were double the MB read/s when performing a Storage vMotion when the block sizes of the source and target datastores where different.

The customer has two storage devices connected to the same Storage Area Network (SAN); an IBM DS4700 and an IBM DS3400. The DS4700 has Fibre Channel disks in it and the DS3400 SATA disks.

I performed a number of tests with a VM having a 22GB fat vmdk file, using the following datastores: –

VMFS_VOL2 Block Size 8MB FC Disks on the DS4700
VMFS_VOL4 Block Size 4MB FC Disks on the DS4700
VMFS_VOL12 Block Size 4MB SATA Disks on the DS3400

Details of the original tests I performed are shown in the image below, click it to see a larger version.

Tests1

I then changed vmfs_vol12 to an 8MB block size to see what difference that made. Transfer times between datastores with the same block size, i.e. 8MB, where the same as the above times for transfers between datastores with matching 4MB block size. Times when the block sizes where different were double the times when the block sizes matched. Transferring to the SATA disks was slower than transferring off the SATA disks as I expected would be the case. When the block size did not match then the MB written per second where always double the MB read per second regardless of whether the transfer was from the 8MB block size to the 4MB block size or from the 4MB block size to the 8MB block size. See details below

Tests2

Now I wondered what would happen if the block sizes where something other than double the other, so I deleted vmfs_vol12 and recreated it with a 1MB block size, my thoughts were that when transferring between an 8MB block size and a 1MB block size I would see the MB written being 8 times the MB read and the transfer time being 8 times the time when the block sizes matched, and when migrating between a 4MB block size and a 1MB block size the figures would be 4 times. However the MB written were once again double the MB read and almost matched the figures above for when the block sizes where different, as detailed below.

Tests3

The figures in the tables above are rough figures as they fluctuated during the migration.

Here are a couple of screenshots from esxtop from when the block sizes match and when they are different.

BlockSizeDifferent

BlockSizeMatch

It does not seem right that if you migrate a VM between datastores with different block sizes then the transfer takes twice as long as when the datastores have the same block size.

Further investigated required. I have posted details on the VMware ESX 4 VMTN Community, see http://communities.vmware.com/thread/293823?tstart=0

Posted in VMware, vSphere | Leave a comment

Enabling Domino Transactional Logging on Windows

When you enable Transactional Logging for Domino on a Windows platform and restart the Domino server transactional logging still is not enabled.

If you issue a show server command on the Domino Console it shows Transactional Logging as still disabled. Checking the server document shows that transactional logging is enabled and the settings have been applied to the notes.ini.

To get transactional logging to work you need to restart the whole Windows server the Domino server is running on not just the Domino server. I can not explain why restarting the whole Windows server is required but it is.

Posted in Domino, IBM, Lotus | 1 Comment

Upgrading Domino Servers on IBM i Platforms

Domino on IBM i Platforms allows multiple versions of the Domino code to be loaded and partition server can run at different code levels. When you download the Domino code for IBM i from the IBM Passport Advantage site it comes as a Windows exe file. Running this is the easiest way to get the code on to the IBM i Platform. It will prompt you for the address of the IBM i Platform and a username and associated password with capabilities to install code, I usually use QSECOFR.

Warning: If you are installing Domino 8.5.x on i5/OS V5 then a Program Conversion will be required and this can take considerable amount of time. I have known it take a couple of hours. There is no indication of what it is doing and the program indicator appear to stick at about 64%. If you need to install Domino 8.5.x on multiple IBM i Platforms running i5/OS V5 then you can save the code from the first system you do and then transfer it to the other systems to save going through the program conversion exercise each time.

You can install the latest code on the IBM i Platform while the Domino servers are running.

1. Shut down the Domino Server.
wrkdomsvr
Select option 6 next to the Domino server to be shut down
F5 will refresh the display and the Domino Status will show as Ended when the server has completely shutdown

2. Run fixup on a non existant database to flush the transaction logs, e.g.
rundomcmd server(servermame) cmd(call pgm(qnotes/fixup) parm(‘fred.nsf’))
You can view the output of this command by selecting option 5 next to domino server to display the console.

3. Update the code
upddomsvr server(servername) torls(*latest)

4. Perform a consistence check of all databases
rundomcmd server(servername) cmd(call pgm(qnotes/fixup) parm(‘-f’ ‘-j’ ‘-v’ ;-l’))
Use option 5 next to the Domino server to monitor the progress of this command, pressing F5 will refresh the display.

5. If upgrading to a version with a different On Disk Structure (ODS) to the previous version convert databases to the new ODS.
The ODS version changed at the following Domino releases
8.5 to ODS 51
8.0 to ODS 48
6.0 to ODS 43
If upgrading to Domino 8.0.x add CREATE_R8_DATABASES=1 to the notes.ini
If upgrading to Domino 8.5.x CREATE_R85_DATABASES=1 to the notes.ini
rundomcmd server(servername) cmd(call pgm(qnotes/compact) parm(‘-c’ ‘-i’))
Again use option 5 next to the Domino server to monitor the progress of this command, pressing F5 will refresh the display.

6. Update all view indexes
rundomcmd server(servername) cmd(call pgm(qnotes/updall) parm(‘-R’))

7. If upgrading to Domino 8.x and you want to enable DAOS see the next blog.

Posted in Domino, IBM, Lotus | Leave a comment