Intel XEON E5-2600-v3 and vSphere 5.0

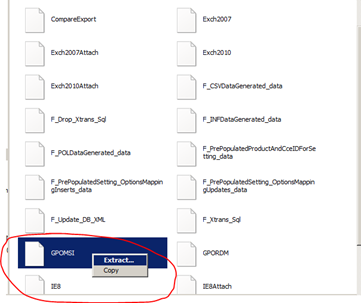
I had an interesting issue recently with HP Proliant BL460c Gen 9 blades containing Intel XEON E5-2600-v3 processors and running ESXi 5.0.

All appeared to be working fine until I added the blades into an existing vSphere cluster with Gen 8 blades containing Intel XEON E5-2600 series processors. I assumed I would be able to vMotion between the blades as the cluster was configured for EVC in Intel Sandy Bridge Generation mode. However, I could vMotion from the Gen 8 blades to the Gen 9 blades but not back to the Gen 8 blades or between the Gen 9 blades. I was getting the following warning when attempting to vMotion from a Gen 9 blade to a Gen 8 blade or between two Gen 9 blades (with the same processors installed in them)

Host CPU is incompatible with the virtual machine’s requirements at CPUID level 0x1 register ‘ecx’.

Host bits: 0001:0110:1001:1000:0010:0010:0000:0011

Required: x111:x11x:11×1:1xx0:xx11:xx1x:xxxx:xx11

Mismatch detected for these features:

* General incompatibilities


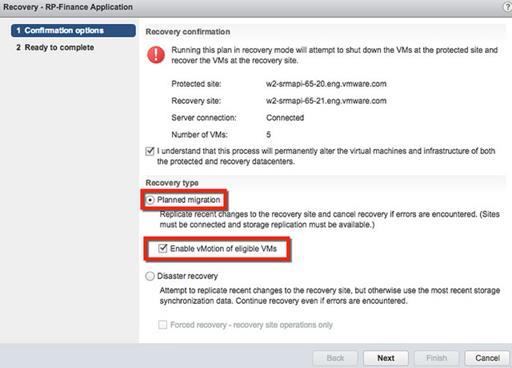
I discovered that if I created a cluster of just the Gen 9 blades without EVC enabled then I could vMotion between them but as soon as I enabled EVC, whichever Intel Mode I selected, I could no longer vMotion between the blades even though they had EXACTLY the same processors in them. I couldn’t even perform a storage vMotion on a VM running on one of the Gen 9 blades if EVC was enabled even if it was staying on the same host and just changing datastore.

On checking the VMware Compatibility Guide the HP BL460c Gen9 blades with Intel XEON E5-2600-v3 processors are not supported on ESXi 5.0. The earliest version they are supported on is 5.1U2 (or 5.5U2). I guess this is because vSphere 5.0 and 5.1 and 5.5 prior to update 2 does not recognise the Intel XEON E5-2600-v3 processors. The compatibility guide lists the version of ESXi and not vCenter so I am not sure if you upgrade vCenter to 5.1U2 and leave the ESXi hosts on 5.0 would you then be able to vMotion using EVC or do you need to get the ESXi hosts upgraded as well. I have not had chance to test this but if I do I will update this article with the results.

Posted in VMware, vSphere | 1 Comment

SRM 6.1 Support for Stretched Storage Cluster

At the US VMworld at the end of August 2015 VMware Site Recovery Manager (SRM) 6.1 was announced. Once of the new features of this release is the support for stretched storage clusters. A stretched cluster is where your storage is stretched between two sites. A stretched storage cluster is used in a vSphere Metro Storage Cluster (vMSC), see https://pelicanohintsandtips.wordpress.com/2015/07/23/vmware-vsphere-metro-storage-cluster-vmsc/ for details of vMSC and the differences between it and SRM.

With SRM 6.1 and a stretched storage cluster this allows SRM recovery plans running in planned mode to utilise vMotion between the sites to move the Virtual Machines stored on the stretched storage cluster. This means a planned migration of the workloads can be performed without an outage. Prior to SRM 6.1 (and a stretched storage cluster) a recovery plan running in planned mode needed to shutdown the virtual machines at the protected site, present the storage at the recovery site and then power the virtual machines on at the recovery site; so there was always an outage in the workloads. As shown in the following screenshot when you perform a Planned migration there is a checkbox to Enable vMotion of eligible VMs.

Further details on this new feature plus the other enhancements in SRM 6.1 can be found at https://www.vmware.com/files/pdf/products/SRM/vmware-site-recovery-manager-whats-new.pdf

As you have two vCenters with SRM, one at the Protected Site and another at the Recovery Site then this new functionality must take advanced of a new vSphere 6 ability to vMotion across sites and between vCenters. Therefore the two vCenters will need to be configured in Enhanced Linked Mode to enable cross vCenter vMotion.

Posted in Site Recovery Manager, VMware, vSphere 6 | Leave a comment

RDM Path Selection Policy (PSP) with Microsoft Clustering

Prior to vSphere 5.5 the Round Robin Path Selection Policy (VMW_PSP_RR) is not supported for the shared disks of a Microsoft cluster. You may find that the ESXi multipathing claim rules are set so that when the RDMs are discovered the PSP is automatically set to Round Robin, so you will want to change this. You will probably want to keep the Round Robin PSP for the other non-shared clustered disks such as LUNs used for VMFS volumes therefore you probably do not want to change the default claim rules.

From vSphere 5.5 the Round Robin PSP is supported for the clusters shared disks.

There is also a NetApp KnowledgeBase article that states that ALUA should not be enabled on the igroup when using Microsoft clustering with shared RDMs prior to vSphere 5.5. See https://kb.netapp.com/support/index?page=content&id=2013316. They have 3 solutions: –

  1. Disable ALUA on the igroup for the ESXi hosts with Microsoft Windows Clustered servers.
  2. Use dedicated initiators for the shared clustered RDMs with ALUA disabled and different initiators for the other LUNs such as VMFS volumes and non-shared RDMs.
  3. Use iSCSI within the Windows Servers for the shared disks.
Posted in Configuration, NetApp, VMware, vSphere | Leave a comment

VMware Paravirtual SCSI Adapter (PVSCSI)

For virtual machines with high disk I/O requirements, such as Tier 1 SQL Servers, you should consider configuring the VM with the VMware Paravirtual SCSI Adapter (PVSCSI).

The PVSCSI adapter was introduced in ESX/ESXi 4.0 and is virtualisation aware. It provides greater performance and uses less CPU cycles than the LSI Logic SCSI adapters. This frees up CPU cycles within your virtual machines and hosts for other activities. Performance benchmarks suggest that using the PVSCSI adapter instead of the LSI Logic adapter will generate approximately 10% improvement in I/O throughput and a 30% reduction in CPU usage. Of course this is dependent on the workload and you may experience higher or lower amounts of improvement.

The driver for the PVSCSI adapter is included as part of the VMware Tools package so you need to have VMware Tools installed to be able to use it. You can use the PVSCSI adapter for your boot device. The following VMware Knowledgebase article details which versions of ESX/ESXi are required when using the PVSCSI adapter with various Operating Systems kb.vmware.com/kb/1010398. If you are installing Windows 2008 or 2012 onto a vDisk using the PVSCSI adapter then you need to supply the driver as part of the installation process, the VM will need a floppy drive configured on it so that the pvscsi-Windows2008.flp image can be attached from the ESXi vmimages folder. Note that the 2008 image is also used for Windows 2012.

VMware do not recommend this adapter for direct attach storage (DAS) but do for SAN environments with I/O intensive applications.

There was an issue with vSphere 4.0 resulting in slower performance when using the PCSCSI adapter with low numbers of I/O requests. This was rectified in vSphere 4.1, details are in this VMware Knowledgebase article kb.vmware.com/kb/1017652.

Hardware version 7 or greater is required to use the PVSCI adapter.

To add a PVSCSI adapter to an existing virtual machine:

  1. Edit the settings of the Virtual Machine
  2. From the Hardware tab click Add.
  3. Select SCSI Device and click Next.
  4. Select an unused device node on an unused SCSI controller, e.g. 1:0 if you only have a single SCSI controller currently configured on the VM.
  5. Click Finish.
  6. Click OK to save your changes.
  7. Edit the VM settings again.
  8. Select the new SCSI controller and click change type.
  9. Select VMware Paravirtual, click OK.
  10. Click OK to save your changes

PVCSCI adapters cannot be used when Microsoft Clustering is being used, for this the LSI Logic SAS controller needs to be used with Windows 2008 and newer or the LSI Logic Parallel adapter for older versions of Windows.

To maximise performance virtual disks should be distributed across multiple vSCSI adapters. A maximum of 4 vSCSI adapter can be configured per VM with a maximum of 15 vDisks per vSCSI adapter. By using multiple vSCSI adapters you open up more I/O queues. The following table shows the queue depths when using the PVSCSI adapters as compared to the LSI Logic SAS adapter


PVSCSI

LSI Logic SAS

Default Adapter Queue Depth

245

128

Maximum Adapter Queue Depth

1,024

128

Default Virtual Disk Queue Depth

64

32

Maximum Virtual Disk Queue Depth

256

32

You need to ensure that your backend storage systems can cope with the amount of I/O being generated from your VMs otherwise additional latency will be introduced at the storage device.

Windows Performance Monitor can be used to record the disk queue length for each disk and therefore allow you to tune the queue depth on the PVSCSI adapter to achieve the best possible performance. Note that you are unable to change the queue depths on the LSI Logic adapter. Details on modifying the queue depth can be found in this VMware knowledgebase article kb.vmware.com/kb/2053145.

Posted in Configuration, VMware, vSphere | Leave a comment

VMware vSphere Metro Storage Cluster (vMSC)

VMware vSphere Metro Storage Cluster (vMSC) is not a product but a certified configuration where a vSphere cluster spans geographical locations. This could be spread across a campus, metropolitan area or a larger area up to 200 km apart.

vMSC was introduced with vSphere 5.0.

It relies on a stretched storage solution such a NetApp MetroCluster and a stretched layer 2 VLAN. The storage must be treated as a single storage solution that spans both sites. The storage is synchronously replicated between the sites so that both sites are always in sync and there is zero data loss in the event of a failure. The storage solution must allow the datastores/LUNs to be access from either location.

This brings the functionality of a local VMware vSphere cluster to hosts spread across two locations so that VMware HA, DRS and vMotion can be performed across the sites as if all the hosts were local. But is this a better solution than SRM? They are different solutions aimed at resolving different problems. vMSC is targeted at disaster avoidance whereas SRM is targeted at disaster recovery.

vMSC achieves disaster avoidance by allowing you to move workloads off failing components without outages.

SRM achieves disaster recovery by automating recovery plans to bring workloads back online in a controlled manor following a disaster.

SRM can be used in a planned migration to move workloads from one site to another site, for example when maintenance is required at the primary site; however an outage is always required to move the workloads with SRM. vMSC can restart workloads at the secondary site when the other site fails using VMware HA but there is little control over the order the failed workloads restart.

This is a good document and case study based on NetApp MetroCluster using iSCSI http://www.vmware.com/files/pdf/techpaper/vSPHR-CS-MTRO-STOR-CLSTR-USLET-102-HI-RES.pdf


It states that a single vCenter is required.


In a stretched-cluster environment, only a single vCenter Server instance is used. This is different from a traditional VMware Site Recovery Manager configuration, in which a dual vCenter Server configuration is required. 


It also recommends using DRS “should” affinity rules to control which VMs are running out of which site. Have a look at the single host failure scenario and note that HA may start the VMs from the failed host on hosts in the other site but DRS will then vMotion them back. It is best to have the VMs running in the correct datacentre as the LUNs are only accessed from one site in a NetApp MetroCluster as it uses a uniform configuration. So when the VMs are restarted in a different site to where the datastore is being accessed from all I/O has to go across the inter-site connects increasing latency.


Also note that if the storage fails in one site then this document states that with NetApp MetroCluster it is a manual process to initiate a takeover to the other site. Also note that VMware HA will only attempt to restart VMs for 30 minutes so if it takes longer than that for the Storage Administrator to initiate the takeover then the VMs will manually need to be restarted.


You can set VMs a restart priority of High, Medium or Low but this is not as comprehensive as the control you have of the restart order with SRM.


This VMware Knowledge Base article (http://kb.vmware.com/selfservice/microsites/search.do?language=en_US&cmd=displayKC&externalId=2031038) mentions a MetroCluster TieBreaker that runs on a OnCommand Unified Manager host at a 3rd site which will monitor the MetroCluster availability and automatically issue the failover commands when there is a site failure.


This Technical White Paper (http://www.vmware.com/files/pdf/techpaper/Stretched_Clusters_and_VMware_vCenter_Site_Recovery_Manage_USLTR_Regalix.pdf) states that SRM is incompatible with stretched clusters. 

Posted in NetApp, Storage, VMware, vSphere | 1 Comment

vSphere VM Memory Statistics

Active Memory

There still seems to be some confusion over what the Active Memory statistic of a virtual machine within vSphere. See example below.

You can see that this virtual machine is configured with 4096 MB of memory and the Active Guest Memory is being reported as 696 MB. So what is this Active Guest Memory? If I look within the operating system of this virtual machine I can see that at this point in time it is using 2.48 GB of memory, see below.

VMware define Active Memory as “Amount of memory that is actively used, as estimated by VMkernel based on recently touched memory pages”. The overhead of monitoring every memory page access would be too much for the hypervisor so a random sampling is used to estimate the active memory. So, how often is “recently”? This depends on where you are looking at the statistic, in vCenter it is refreshed every 20 seconds so it is showing the amount of memory that has been touched in the last 20 seconds.

If we look at the memory charts in vCenter for this virtual machine we can see that the active memory is fairly static at between 750 MB and 1,000 MB.

You could assume from this that the virtual machine is only using about 1 GB of memory; however we saw the operating system reporting that about 2.5 GB was being used. What we don’t know from the information in the graph is if for each sampling period it was the same memory pages that were touched. It could be that in one 20 second period 750 MB of memory was accessed and in the next 20 seconds a different 750 MB of memory was accessed. For this reason this statistic is not a good value to take to right-size the virtual machine.

Consumed Memory

What I notice for Windows Servers is that the Consumed Host Memory is always almost equivalent to the amount of memory configured on a virtual machine. Taking the example above where the virtual machine is configured for 4096 MB of memory the consumed memory is being reported as 4144 MB. This is higher than the configured memory as it also includes the memory overhead used by the hypervisor to run the virtual machine. My understand of why Windows Server report that they are consuming all of the memory they are allocated for, even though we can see from the operating system in this case that it is only using 2.5 GB is because when the server boots up it zeros out all of the memory pages and therefore the hypervisor needs to present these memory pages to the virtual machine.

Posted in VMware | 1 Comment

Windows Server 2012 R2 VM Network Adapter

When creating a Windows Server 2012 virtual machine the network adapter type defaults to E1000. I have seen reports of this dropping network connections and packet loss on Windows Server 2012.

There is a newer emulated network interface available for Windows Server 2012, the E1000e. However, there is a VMware KB article detailing possible data corruption when using the E1000e network adapter type with Windows Server 2012, see http://kb.vmware.com/kb/2058692.

For best performances I would recommend using the latest VMware paravirtualised VMXNET3 network adapter type. If you are streaming the OS using something like SCCM instead of a VMwaere Template then you may have an issue using VMXNET3 as there is no driver available for it in PXE.  If this is the case then you may be able to edit the PXE boot image to include the VMXNET3 driver or you could have a VM with two network interfaces, an E1000 or E1000e used to PXE boot and then a VMXNET3 for when the OS and VMware Tools are installed, at this point the E1000(e) can be removed from the virtual machine.

This is a good article on the differences between emulated network adapters (E1000, E1000e) and VMware paravirtualised network adapters (VMXNET, VMXNET2 E and VMXNET3). http://rickardnobel.se/vmxnet3-vs-e1000e-and-e1000-part-1/

This articles show the throughput benefits of using VMXNET3 on Windows Server 2008 R2 and Windows Server 2012 R2. http://rickardnobel.se/vmxnet3-vs-e1000e-and-e1000-part-2/

I often see environments using a mixture of E1000 and Flexible with a few VMXNET3. Flexible was an option on a Windows Server 2003 virtual machine that worked as a vLance adapter (emulated 10 Mbps network interface) but if VMware Tools was installed it switched to the first generation VMware paravirtualised VMXNET network interface.  To get a list of network adapter types used in your environment use PowerCLI, connect to your vCenter

Connect-VIServer <vCenter-Server-Name>

e.g.

Connect-VIServer vcenter01

and then get all VMs and select the VM name and the network adapter type with the command

Get-VM | Select Name, {$_.NetworkAdapter.Type}

You can capture all of this information to a csv file by piping the output to Export-CSV like this

Get-VM | Select Name, {$_.NetworkAdapter.Type} | Export-CSV <filename>

e.g.

Get-VM | Select Name, {$_.NetworkAdapter.Type} | Export-CSV network-types.csv

This VMware Performance Study compares E1000 to VMXNET2 (Enhanced VMXNET) but it is old and based on ESX 3.5. http://www.vmware.com/files/pdf/perf_comparison_virtual_network_devices_wp.pdf

This VMware Performance Study compares VMXNET2 to VMXNET3, again it is fairly old now and based on vSphere 4. It does show how VMXNET3 has less CPU overhead than VMXNET2 in most cases. Generally VMXNET (any generation) has less CPU overhead than E1000e as it is designed for a virtual environment, this lower CPU overhead allows the driver to perform better and frees up CPU cycles for other workloads. https://www.vmware.com/pdf/vsp_4_vmxnet3_perf.pdf

Posted in Configuration, VMware, vSphere, Windows 2012 | Leave a comment

VCP6-DCV Exam Released

The beta version of the VCP6-DCV (Data Centre Virtualisation) exam was released last week.

For current VCP5-DCV candidates there is a delta exam is shorter than the “normal” VCP6-DCV exam focusing on the new content of VCP6. The Delta exam contains 75 questions with a time limit of 90 minutes, whereas the “normal” exam has 100 questions with a time limit of 120 minutes.

If you are not a current VCP then you now need to take two exams to become a VCP6-DCV, as well as attending one of the required training course. The two exams are the vSphere 6 Foundations exam and the VCP6-DCV exam. The Foundation exam for this covers the fundamental skills necessary to understand and begin deploying VMware vSphere environments.

Further information on the Delta exam can be found here https://mylearn.vmware.com/mgrReg/plan.cfm?plan=64181&ui=www_cert

Further information on the Foundation exam can be found here https://mylearn.vmware.com/mgrReg/plan.cfm?plan=64179&ui=www_cert

Further information on the VCP6-DCV exam can be found here https://mylearn.vmware.com/mgrReg/plan.cfm?plan=64180&ui=www_cert

Certification paths for new VCPs and existing VCPs can be found here https://mylearn.vmware.com/mgrReg/plan.cfm?plan=64178&ui=www_cert

I believe the Beta exams will be available until 27th May 2015.

Posted in Certification, VMware | Leave a comment

What’s New in VMware vSphere 6

vSphere 6 was announced at the start of February 2015 and is now available for download.

This version is marketed, in VMware’s words, as “the industry-leading virtualisation platform which empowers users to virtualise any application with confidence, redefines availability, and simplifies the virtual data centre” and that it is “a highly available, resilient, on-demand infrastructure that is the ideal foundation for any cloud environment”.

This version contains the following new features and enhancements: –

  • Increased Scalability
    • Clusters now support
      • 64 hosts per cluster, up from 32 in the previous version
      • 8000 virtual machines per cluster
    • Hosts now support
      • 480 CPUs
      • 12TB RAM
      • 1024 virtual machines per host
    • Virtual Machines now support
      • 128 virtual CPUs (vCPUs)
      • 4TB virtual RAM (vRAM)
  • Improvements to ESXi Local Accounts
    • Centralised management of local accounts on ESXi hosts using new ESXCLI commands to add, list, remove and modify accounts across all hosts in a cluster using vCenter. Previously you had to connect directly to each ESXi host in turn to manage the local accounts
    • New settings on the ESXi hosts to control number of failed login attempts before locking a local account and how long the account is locked for
    • Improved method of configuring ESXi local account password complexity rules via the Host Advanced System Settings instead of manually editing the /etc/pam.d/passwd file
  • Improved auditability of ESXi administrator accounts – ESXi logs now show logon user details when tasks performed from vCenter instead of just showing vpxuser
  • Lockdown mode improved to provide two levels:
    • Normal Lockdown Mode – Allows users on the DCUI.Access list to still access the Direct Console User Interface (DCUI)
    • Strict Lockdown Mode – DCUI disabled
    • Exception Users – Users allowed host access regardless of lockdown mode
  • Smart Card Authentication to DCUI – for U.S. federal customers only
  • Support for the latest x86 sets, devices, drivers, and guest operating systems
  • NVIDIA GRID Support
  • Instant Clone – virtual machines can be cloned 10x fasters than in previous versions of vSphere
  • vSphere Virtual Volumes
  • Per-VM Distributed vSwitch Network IO Control (NIOC) bandwidth reservations allowing isolation and enforcing limits on bandwidth
  • IGMP snooping for IPv4 packets in Distributed vSwitches
  • MLD snooping for IPv6 packets in Distributed vSwitches
  • Multiple TCP/IP Stack for vMotion provides vMotion traffic a dedicated network stack with a dedicated default gateway for the vMotion traffic.
  • vMotion Enhancements
    • Perform non-disruptive live migration of workloads across virtual switches
    • Perform non-disruptive live migration of workloads across vCenter Servers
    • Perform non-disruptive live migration of workloads over distances up to 150ms RTT, an improvement from 10ms in previous version of vSphere
    • Replication-Assisted vMotion – allows environments with active-active replication set up between two sites to perform a more efficient vMotion resulting in as much as 95% time saving
  • Fault Tolerance Enhancements
    • Now supports up to 4 vCPUs, an increase from a single vCPU in previous versions
    • VMware vSphere Data Protection, and other VMware Snapshot based backup solutions utilising VMware vSphere Storage APIs, can now be used with virtual machines protected by vSphere FT
    • Storage is also now duplicated between the two FT VM instances so that the storage is protected as well as the compute and memory. This also means that local storage can be utilised as well as shared storage.
    • All virtual disk formats can now be used, previous versions had to use eager-zero thick.
  • vSphere Content Library – a centralised repository of virtual machine templates, ISO images and scripts. Content stored and managed centrally and shared via a publish/subscribe model.
  • You can now copy and move virtual machines between hosts on different vCenter Servers in a single action
  • A streamlined, more responsive and intuitive Web Client
  • Virtual machine enhancements
    • Hot-add RAM enhancements to vNUMA – memory allocate equally across all NUMA regions instead of all to region 0
    • WDDM 1.1 GDI acceleration
    • USB 3.0 xHCI controller
    • Several serial and parallel port enhancements
      • Serial and parallel ports can now be removed (I presume this means Hot-Remove because you could remove serial and parallel ports when the virtual machine was powered off on previous versions)
      • Maximum number of serial ports increased to 32
    • The following additional guest operating systems are supported: –
      • Oracle Unbreakable Enterprise Kernel Release 3 Quarterly Update 3
      • Asianux 4 SP4
      • Solaris 11.2
      • Ubuntu 12.04.5
      • Ubuntu 14.04.1
      • Oracle Linux 7
      • FreeBSD 9.3
      • Mac OS X 10.10
    • Windows Server Failover Clustering (WSFC) Enhancements
      • Support for WSFC on Windows Server 2012 R2
      • Support for Microsoft SQL Server 2012 AlwaysOn Availability Groups
      • Support for the PVSCSI adapter with virtual machines running WSFC to provide superior performance to that with the standard SCSI adapter
      • vMotion (and DRS) fully supported with Windows Server 2008 and later when using WSFC clustered across hosts using physical-mode RDMs.
    • vCenter Server Improvements
      • Simplified deployment
        • Two deployment models
          • Embedded – deploys new Platform Services Controller (PSC) and the vCenter Server system on the same server
          • External – deploys PSC and vCenter on different servers
        • All vCenter Server services (Inventory Services, Web Client, Auto Deploy, e.t.c.) are installed along with vCenter. There is no longer separate installers
        • Update Manager is still a standalone Windows installation
      • Linked mode enabled by default and supported with the vCenter Server Appliance
      • Reduction is the number of certificates required to manage the environment
      • VMware Certificate Authority used to generate certificates instead of using self-signed certificates
      • Increased maximums for vCenter Server Appliance, using either embeded or external database to match Windows vCenter Server, i.e.
        • 1,000 hosts
        • 10,000 powered on virtual machines
        • 64 hosts per cluster
        • 8,000 virtual machines per cluster

I will dig into some of these features in more details in future articles.

Posted in VMware, vSphere, vSphere 6 | Leave a comment

Windows 2012 R2 Group Policy Settings including MSS Settings

Firstly, if you have a Windows 2008 domain and want to set Windows 2012 R2 specific Group Policy settings for the Windows 2012 R2 members servers you will be adding to the domain then you will need to use the “Group Policy Management” feature from a Windows 2012 R2 server. To do this provision a Windows 2012 R2 server into you domain and install the “Group Policy Management” feature, see Installing Group Policy Management on Windows Server 2012 R2.

If you also want to set the Microsoft Security Settings prefixed with MSS based on the CIS Security Benchmarks from http://www.cisecurity.org/ then these are not included be default. They can added by running a script from the “Microsoft Security Compliance Manager”, you can do this as follows: –

Download the “Microsoft Security Compliance Manager” from http://technet.microsoft.com/en-gb/library/cc677002.aspx.

You will not want to fully install the package as it installs Microsoft SQL Express and other stuff you don’t really want. However, start the installation by running the downloaded Security_Compliance_Manager_Setup.exe which will unpack the installation files to a temporary directory such as C:\ adb01aff27798ababea02738a9f4.

Once the files have been unpacked open data.cab from the temporary directory and extract the file GPOMSI, rename this file LocalGPO.msi.

You can now cancel the “Microsoft Security Compliance Manager” installation; it should remove the temporary directory and the unpacked files.

Install LocalGPO.msi on the Windows 2012 R2 Server, at the “Welcome” screen press “Next>

Select “I accept the terms in the License Agreement” and click “Next>

The “LocalGPO Tool” feature should already be selected to be installed so click “Next>“.

Click “Install“.

Click “Finish” once the installation has completed.

You will now have a “LocalGPO Command-Line” application, run this as an administrator.

From this command line run the command

    cscript LocalGPO.wsf /ConfigSCE

Unless Microsoft have added support for Windows 2012 R2 to this package by the time you read this then when you run the above command you will get an error messages stating that you are running it on an unsupported Operating System. To get around this issue edit LocalGPO.wsf (you can do this by opening it with Notepad). Go to the line in the ChkOSVersion routine that reads (think this is line 480):

If(Left(strOpVer,3) = “6.2”) and (strProductType <> “1”) then

Insert before this line the following:

If(Left(strOpVer,3) = “6.3”) and (strProductType <> “1”) then
strOS = “WS12”

And then insert Else at the start of the line

If(Left(strOpVer,3) = “6.2”) and (strProductType <> “1”) then

To change it to

ElseIf(Left(strOpVer,3) = “6.2”) and (strProductType <> “1”) then

So that the whole section now reads:

If(Left(strOpVer,3) = “6.3”) and (strProductType <> “1”) then
    strOS = “WS12”
ElseIf(Left(strOpVer,3) = “6.2”) and (strProductType <> “1”) then
    strOS = “WS12”
ElseIf(Left(strOpVer,3) = “6.2”) and (strProductType = “1”) then
    strOS = “Win8”
ElseIf(Left(strOpVer,3) = “6.1”) and (strProductType <> “1”) then
    strOS = “WS08R2”
ElseIf(Left(strOpVer,3) = “6.1”) and (strProductType = “1”) then
    strOS = “Win7”
ElseIf(Left(strOpVer,3) = “6.0”) and (strProductType <> “1”) then
    strOS = “WS08”
ElseIf(Left(strOpVer,3) = “6.0”) and (strProductType = “1”) then
    strOS = “VISTA”
ElseIf(Left(strOpVer,3) = “5.2”) and (strProductType <> “1”) then
    strOS = “WS03”
ElseIf(Left(strOpVer,3) = “5.2”) and (strProductType = “1”) then
    strOS = “XP”
ElseIf(Left(strOpVer,3) = “5.1”) and (strProductType = “1”) then
    strOS = “XP”
Else
strMessage = DisplayMessage(conLABEL_CODE002)
Call MsgBox(strMessage, vbOKOnly + vbCritical, strTitle)
Call CleanupandExit
End If

Once you have changed the LocalGPO.wsf script as detailed above close the “LocalGPO Command-line” and stat it again and run

    cscript LocalGPO.wsf /ConfigSCE

It should now work and you should end up with the MSS settings available to set in a Group Policy Object


Posted in Group Policy, Windows 2012 | 2 Comments