
I had a requirement to deploy a number of virtual machines from a template, so decided to do this from PowerShell instead of via the vSphere Client.
I was happy for each of the virtual machines to be named with a prefix, such as win-dev-srv, with a unique number at the end. Each machine had to have its own IP address. When using the vSphere Client I had a OS Customisation Specification which prompted for an IP address when it was used, e.g.
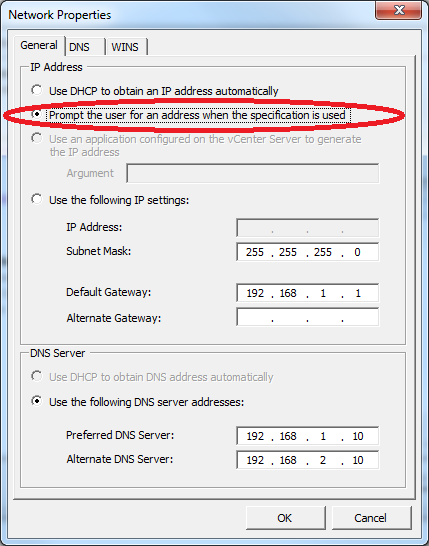
I couldn’t find a way to use this from PowerCLI so I change it to use a static IP address and got the PowerShell script to change the static IP address each time before it was used. I used the following script
$StartingIp = “192.168.1.101”
$SubNetMask = “255.255.255.0”
$DefaultGateway = “192.168.1.1”
$DNS = “192.168.1.10”,“192.168.2.10”
$NumVMs = 45
$DataStore = “TestDev_DS_Cluster”
$VMNamePrefix = “win-dev-srv”
$Folder = “Development”
$Template = “Win2K8R2Std”
$Cluster = “UK-London”
$OSCustSpec = “Dev-Servers”
#Deploy VMs
$VMIP = $StartingIp
For ($count=1;$count -le $NumVMs; $count++) {
$VMName = $VMNamePrefix + $count
Get-OSCustomizationSpec -name $OSCustSpec | Get-OSCustomizationNICMapping | Set-OSCustomizationNICMapping -IPMode UseStaticIP -IPAddress $VMIP -SubNetMask $SubNetMask -DefaultGateway $DefaultGateway -dns $DNS
New-VM -Name $VMName -Template $Template -Datastore $DataStore -ResourcePool $Cluster -Location $Folder -OSCustomizationSpec $OSCustSpec -RunAsync
$NextIP = $VMIP.Split(“.”)
$NextIP[3] = [INT]$NextIP[3]+1
$VMIP = $NextIP -Join“.”
}
#Start VMs
For ($count=1;$count -le $NumVMs; $count++) {
$VMName = $VMNamePrefix + $count
While ((Get-VM $VMName).Version -eq “Unknown”) {Write-Host “Waiting to start $VMName”}
Start-VM $VMName
}
I set a few variables at the start of the script: –
-
$StartingIp – This is the IP address the first VM will be configured for; the last Octet will be incremented by 1 for each subsequent VM, e.g.
- First VM will be 192.168.1.101
- Second VM will be 192.168.1.102
- …….
- Tenth VM will be 192.168.1.110
- e.t.c.
- $SubNetMask – This is the subnet mask to be configured on the network interface of each VM being provisioned
- $DefaultGateway – This is the default gateway to be configured on the network interface of each VM being provisioned
- $DNS – These are the DNS addresses to be configured on the network interface of each VM being provisioned
- $NumVMs – This is the number of VMs to be provisioned
- $DataStore – This is the datastore the VMs are deployed to. The limitation of this version of the script is that all VMs are deployed to the same datastore. In my case I had a Cluster of half a dozen datastores so used the Datastore Cluster name and let Storage DRS decide which datastore to put them on.
-
$VMNamePrefix – This is the prefix of the VM name; a unique number starting at 1 and incremented by 1 for each VM is appended to the end of this name, e.g.
- First VM will be win-dev-srv1
- Second VM will be win-dev-srv2
- …….
- Tenth VM will be win-dev-srv10
- e.t.c.
- $Folder – This is the folder the VMs will be placed in within the vSphere Inventory
- $Template – This is the template to be used to deploy the VMs from
- $Cluster – This is the vSphere Cluster the VMs will run on
- $OSCustSpec – This is the OS Customisation Specification to be used to deploy the VMs
The script then cycles around the amount of times you have set for the number of VMs to be deployed doing the following:
- Adds the number to the end of the VM prefix name
- Modifies the OS Customisation Specification to include the IP address to be used
- Deploys a New VM to the correct location using the specified template and the Customisation Specification – Note this is run asynchronous so that the command does not wait for the VM to complete being deployed before starting the next one
- Increments the IP address ready for the next VM
Once all of the VMs have started to be deployed the script then cycles around starting the VMs so that the Customisation Specification can configure them. As the New-VM command was run with the -RunAsync switch the script checks if the VM version is set to “Unknown”, if it is then it is probably because the VM has not finished deploying and therefore the script waits for the version number to be something other than “Unknown” before it attempts to start the VM.
The script could have been modified so that the variables were passed in a parameters, however as I had to run it a number of times I found it easier to edit the script each time to change the variables before running it.
Before you can run the script you need to have connected to the relevant vCenter server within your PowerShell session with the command: –
Connect-VIServer servername
This will attempt to connect to the vCenter Server with name servername with the userid you running the PowerShell session as, if you connect to the vCenter Server using different credentials I would suggest using the following command
Connect-VIServer servername -Credential (Get-Credential username)
https://github.com/rnelson0/powercli-modules/commit/ea33afd67b8cf576ca4864d9795293df849e2598
I managed to convert this to a PowerShell cmdlet in my PowerCLI Admin module and fixed some issues with the Static IPs by creating Non-Persistent OSCustomizationSpecs that work with Linux as well as Windows. I credited this blog post in the cmdlet description. Thanks!
Pingback: PowerCLI GitHub Repo – March 2014 Updates | rnelson0