ESXi 5.5 Hosts Not Restoring Storage Paths Following SAN Switch Failure

While performing resilience tests for a customer I identified that following the failure of a SAN switch the ESXi hosts did not restore lost storage paths once the SAN switch was brought back into service.

The infrastructure in question was an IBM Flex System containing x240 compute nodes running vSphere ESXi 5.5.0 from an internal USB memory key. The compute nodes had the IBM Flex System FC5054-4-port 16Gb FC Adapters installed in them, which are Emulex LPe16000 quad port fibre channel adapters. The Flex System chassis contained 2 x IBM Flex System FC5022 24-port 16Gb ESB SAN Scalable switch, this is a Brocade Switch. The storage was presented from an IBM XIV over the Fibre Channel fabric.

When one of the SAN switches was pulled from the rear of the Flex System to simulate it failing then half of the paths to each LUN were lost. Once the SAN switch was brought back into service the paths via it still stayed “dead”. A reboot of the ESXi host appeared to be the only method of restoring these paths.

I tracked the problem down to the driver being used by the ESXi hosts for the fibre channel adapters; this was version 10.0.100.1-vmw.550.0.0.1331820. I downloaded the Emulex FC adapter for these cards from the VMware website, these was version 10.0.725.203-1OEM.550.0.0.1331820 (https://my.vmware.com/web/vmware/details?downloadGroup=DT-ESXI55-EMULEX-LPFC-10072744&productId=353).

I uploaded the VIB file (lpfc-10.0.725.203-1OEM.550.0.0.1331820.x86_64.vib) from the downloaded package to a datastore named XIV_TEMPLATES and stored it in a folder named Drivers. All of the ESXi could access this datastore so I could then use the following procedure to update the driver on each of the ESXi hosts

  1. Put the host into maintenance mode first
  2. Enable SSH
  3. Login to the host via SSH as root
  4. Check the current version with the command
    esxcfg-module -i lpfc
    There is a lot of output from this command and the version is displayed on the 3rd line
  5. Update the driver with the command
    esxcli software vib update -v /vmfs/volumes/XIV_TEMPLATES_DS_01/Drivers/lpfc-10.0.725.203-1OEM.550.0.0.1331820.x86_64.vib
    output should be
    Installation Result
    Message: The update completed successfully, but the system needs to be reboot
    Reboot Required: true
    VIBs Installed: Emulex_bootbank_lpfc_10.0.725.203-1OEM.550.0.0.1331820
    VIBs Removed: VMware_bootbank_lpfc_10.0.100.1-1vmw.550.0.0.1331820
    VIBs Skipped:
  6. Reboot the host
  7. Check the version is now 10.0.725.203-1OEM.550.0.0.1331820 by running the command in 4 above, you will need to enable SSH again

Once the driver was updated and the hosts rebooted then the dead paths were automatically restored following a failure of the SAN switch.

Posted in Flex System, IBM, Storage, VMware, vSphere, XIV | 2 Comments

I Love PowerCLI!

I had a requirement to add an additional virtual hard disk to 50 virtual machines. This was going to be a painful job through the vSphere Client so I resorted to PowerCLI.

The virtual machines all had a name starting PerfTest with a number at the end from 1 through to 50, e.g. PerfTest1, PerfTest2, ….., PerfTest50. The new virtual hard disks all needed to be created on a datastore separate to the virtual machine, named XIV_PERFTEST_NOREP and each of them needed to be 8GB.

I was able to create and add all of these new virtual hard disk with a single line of PowerCLI

For ($i=1;$i le 50;i++) {New-HardDisk –VM PerfTest$i –CapacityGB 8 –Datastore XIV_PERFTEST_NOREP}

Posted in PowerCLI, Powershell, VMware | Leave a comment

Creating Multiple Virtual Machines with PowerCLI

I had a requirement to deploy a number of virtual machines from a template, so decided to do this from PowerShell instead of via the vSphere Client.

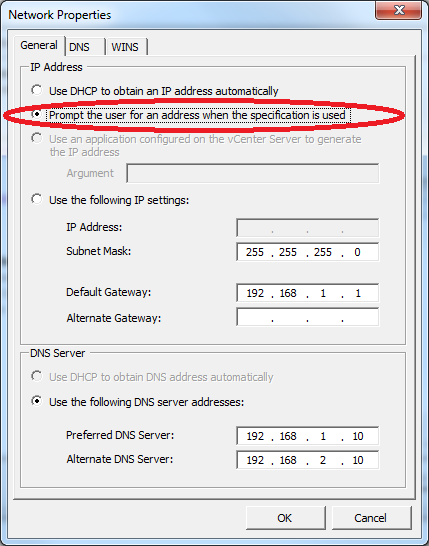
I was happy for each of the virtual machines to be named with a prefix, such as win-dev-srv, with a unique number at the end. Each machine had to have its own IP address. When using the vSphere Client I had a OS Customisation Specification which prompted for an IP address when it was used, e.g.

I couldn’t find a way to use this from PowerCLI so I change it to use a static IP address and got the PowerShell script to change the static IP address each time before it was used. I used the following script

$StartingIp = “192.168.1.101”
$SubNetMask = “255.255.255.0”
$DefaultGateway = “192.168.1.1”
$DNS = “192.168.1.10”,“192.168.2.10”
$NumVMs = 45
$DataStore = “TestDev_DS_Cluster”
$VMNamePrefix = “win-dev-srv”
$Folder = “Development”
$Template = “Win2K8R2Std”
$Cluster = “UK-London”
$OSCustSpec = “Dev-Servers”

#Deploy VMs
$VMIP = $StartingIp
For ($count=1;$count -le $NumVMs; $count++) {
    $VMName = $VMNamePrefix + $count
    Get-OSCustomizationSpec -name $OSCustSpec | Get-OSCustomizationNICMapping | Set-OSCustomizationNICMapping -IPMode UseStaticIP -IPAddress $VMIP -SubNetMask $SubNetMask -DefaultGateway $DefaultGateway -dns $DNS
    New-VM -Name $VMName -Template $Template -Datastore $DataStore -ResourcePool $Cluster -Location $Folder -OSCustomizationSpec $OSCustSpec -RunAsync
    $NextIP = $VMIP.Split(“.”)
    $NextIP[3] = [INT]$NextIP[3]+1
    $VMIP = $NextIP -Join“.”
}

#Start VMs
For ($count=1;$count -le $NumVMs; $count++) {
    $VMName = $VMNamePrefix + $count
    While ((Get-VM $VMName).Version -eq “Unknown”) {Write-Host “Waiting to start $VMName”}
    Start-VM $VMName
}

I set a few variables at the start of the script: –

  • $StartingIp – This is the IP address the first VM will be configured for; the last Octet will be incremented by 1 for each subsequent VM, e.g.
    • First VM will be 192.168.1.101
    • Second VM will be 192.168.1.102
    • …….
    • Tenth VM will be 192.168.1.110
    • e.t.c.
  • $SubNetMask – This is the subnet mask to be configured on the network interface of each VM being provisioned
  • $DefaultGateway – This is the default gateway to be configured on the network interface of each VM being provisioned
  • $DNS – These are the DNS addresses to be configured on the network interface of each VM being provisioned
  • $NumVMs – This is the number of VMs to be provisioned
  • $DataStore – This is the datastore the VMs are deployed to. The limitation of this version of the script is that all VMs are deployed to the same datastore. In my case I had a Cluster of half a dozen datastores so used the Datastore Cluster name and let Storage DRS decide which datastore to put them on.
  • $VMNamePrefix – This is the prefix of the VM name; a unique number starting at 1 and incremented by 1 for each VM is appended to the end of this name, e.g.
    • First VM will be win-dev-srv1
    • Second VM will be win-dev-srv2
    • …….
    • Tenth VM will be win-dev-srv10
    • e.t.c.
  • $Folder – This is the folder the VMs will be placed in within the vSphere Inventory
  • $Template – This is the template to be used to deploy the VMs from
  • $Cluster – This is the vSphere Cluster the VMs will run on
  • $OSCustSpec – This is the OS Customisation Specification to be used to deploy the VMs

The script then cycles around the amount of times you have set for the number of VMs to be deployed doing the following:

  • Adds the number to the end of the VM prefix name
  • Modifies the OS Customisation Specification to include the IP address to be used
  • Deploys a New VM to the correct location using the specified template and the Customisation Specification – Note this is run asynchronous so that the command does not wait for the VM to complete being deployed before starting the next one
  • Increments the IP address ready for the next VM

Once all of the VMs have started to be deployed the script then cycles around starting the VMs so that the Customisation Specification can configure them. As the New-VM command was run with the -RunAsync switch the script checks if the VM version is set to “Unknown”, if it is then it is probably because the VM has not finished deploying and therefore the script waits for the version number to be something other than “Unknown” before it attempts to start the VM.

The script could have been modified so that the variables were passed in a parameters, however as I had to run it a number of times I found it easier to edit the script each time to change the variables before running it.

Before you can run the script you need to have connected to the relevant vCenter server within your PowerShell session with the command: –

Connect-VIServer servername

This will attempt to connect to the vCenter Server with name servername with the userid you running the PowerShell session as, if you connect to the vCenter Server using different credentials I would suggest using the following command

Connect-VIServer servername -Credential (Get-Credential username)

Posted in PowerCLI, Powershell, VMware | 2 Comments

VMware Site Recovery Manager 5.1.x Installation

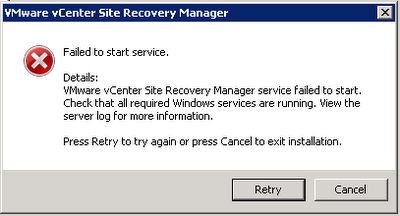
While installing VMware Site Recovery Manager 5.1.x I had an issue where the service failed to start with the following error message

The setup was as follows: –

  • vCenter Server 5.1 Update 1 on its own server
  • SQL Server 2008 R2 on its own server
  • Site Recovery Manager on its own server

Process I used was

  1. Created a user in Active Directory to be used by SRM, e.g. SRM_User.
  2. Added this user to the SQL Server.
  3. Created a new database on the SQL server for SRM and gave the SRM User db_owner access to it.
  4. Created a 64-bit ODBC DSN on the SRM Server to access the database, remember SRM 5.1 is a 64-bit application so requires a 64-bit DSN instead of a 32-bit DSN as in previous versions. The DSN used Windows Authentication.
  5. Installed SRM on the SRM server and got the error displayed above.

To fix this I changed the VMware Site Recovery Manager service to logon as the AD SRM_User. I also had to add the SRM_User as a local administrator on the SRM server. You need to change the service while the error message is displayed and then click Retry.

Perhaps if the ODBC DSN used SQL authentication I could have left the service to run as the Local System Account. Further testing required to verify this.

I also did the following but not sure if it was important or not:

  1. Gave the SRM_User the following server roles on the SQL Server (the SRM documentation says that the user must have Bulk insert, connect and create table access)
    1. bulkadmin
    2. dbcreator
  2. When I created the SRM database I set the owner to be SRM_User instead of granting the user access after I created the database, doing this sets the dbo user of the database to be the SRM_User with a default schema of dbo. The SRM documentation says that the schema name should match the user name.

I will have to do further testing to see if these are important.

Posted in Site Recovery Manager, VMware | Leave a comment

VMware Site Recovery Manager 5.1 and IBM N series (NetApp) SRA

I had an issue with VMware Site Recovery Manager 5.1 with the IBM N series SRA and suspect it would be the same with the NetApp SRA.

SRM version installed 5.1.1, N series SRA version 2.0.1 installed.

When discovering replicated devices the task failed with a “Timed out (300 seconds) while waiting for SRA to complete ‘discoverDevices’ command”. To fix this I had to increase the storage command timeout value. I changed it to 600. This can be changed by right clicking on the site in the Site Recovery Manager GUI and selecting Advanced Settings, then under storage changing the storage.commandTimeout value from 300 to 600. I did this for both sites.

The next error while discovering replicated devices was “Internal error:std:exception ‘class Dr::Xml::XmlValidateException’ “Element ‘SourceDevices’ is not valid for content model: ‘(SourceDevice,)”.”. I have replicate and non-replicated volumes on the N series controllers that are not for VMware Datastores or VMware RDMs such as CIFS volume and iSCSI volumes for other physical servers. All of the VMware volumes are prefixed with NFS_VMware or VMFS so I edited each of the Array Managers and set “Volume include list” to “NFS_VMware, VMFS”. Note when editing the Array Manager you need to enter the username and password that the array manager uses to access the storage controller as the fields are blanked out.

Posted in NetApp, Site Recovery Manager, VMware | Leave a comment

Carefully Plan Filer Names and Volume Names when using VMware Site Recovery Manager with NetApp / IBM N series SRA

I have been struggling with an issue reprotecting a Protection Group within VMware Site Recovery Manager with the IBM N series (NetApp) Storage Replication Adapter.

The first step Configure Storage to Reverse Direction would fail with “Error – Failed to reverse replication for failed over devices. SRA command ‘prepareReverseReplication’ failed. Peer array ID provided in the SRM input is incorrect Check the SRM logs to verify correct peer array ID.

The setup was as follows

Site-A                                                              Site-B
Array Manager – NSERIES01                        Array Manager – DRNSERIES01
Local device – /vol/NFS_VMware_Test         Local Device – /vol/NFS_VMware_Test

NSERIES01:NFS_VMware_Test was SnapMirrored to DRNSERIES01:NFS_VMware_Test 

The volume had a single virtual machine in it with a single vmdk and was running at Site-A.

I had a protection group for this replication pair with the single virtual machine in it.

I could successfully recover the protection group at Site-B and reprotect it so that the SnapMirror was now from DRNSERIES01:NFS_VMware_Test to NSERIES01:NFS_VMware_Test and the Recovery Plan was created at Sie-A. I could then recover the protect group back to Site-A (i.e. the new fail-back functionality in SRM 5). It was when I tried to reprotect the protection group again so that it was ready for a subsequent recovery to Site-B that I had this issue.

I also had the issue if I started with a Protect Group at Site-B, recovered it at Site-A, I could not perform a reprotect back to Site-B.

Checking the SRM logs showed the following

validating if path NFS_VMware_Test is valid mirrored device for given peerArrayId

curr state = invalid, prev state = ,source name:DRNSERIES01:NFS_VMware_Test, destination:NSERIES01:NFS_VMware_Test, path=NFS_VMware_Test, arrayID:NSERIES01
Skipping /vol/NFS_VMware_Test as peerArrayId DRNSERIES01  is not valid

I placed a support call with VMware who pointed out that the error message was coming from the SRA and therefore I would need to place a call with IBM. IBM were struggling to find a reason for this error and after IBM Level 2 support could not find the reason the passed it to NetApp to investigate. The first response from NetApp was to wait for the resync to complete before doing the Reprotect, however it is the Reprotect that does the resync so that response was obviously rubbish. 

While I was waiting for IBM to come back to me I posted the issue on both the NetApp and VMware Forums and reached out to the two best guys that I know at VMware for SRM, Mike Laverick and Lee Dilworth. Both had good suggestions about making sure everything was setup exactly as detailed in the documentation, but as it was I still did not have a solution. Links to the Forum posts NetApp and VMware.

So I decided to dig into the perl scripts that the SRA uses to find the problem myself. After a lot of investigation and debugging the perl scripts used by the NetApp (IBM N series SRA) I discovered the following:

The issue was that the filer name at the Recovery Site had the same name as the filer at the Protected Site with a prefix on it, i.e. in my case the Recovery Site filer was named NSERIES01 and the Protected Site was DRNSERIES01.  Remember I had already performed a fail-over and fail-back so the Protected Site was my original Recovery Site, so yes the filer on the Protected Site for this Protection Group is DRNSERIES01 and the Recovery Site has NSERIES01 on it.

When the Reprotect task is run the first step is to call the SRA with the command prepareReverseReplication, this calls reverseReplication.pl which attempts to check that the SnapMirror is broken off.  It gets the status of all of the SnapMirrors from the filer at the Recovery Site, i.e. in this case NSERIES01.  It then goes through each of these looking for a match of the local-filer-name:volume-name in the source of the snapmirror, e.g. for my test group it was attempting to match NSERIES01:NFS_VMware_Test, at this point the source of the SnapMirror is DRNSERIES01:NFS_VMware_Test which is correct but because the script is using a pattern matching test it matches NSERIES01:NFS_VMware_Test to DRNSERIES01:NFS_VMware_Test as NSERIES01:NFS_VMware_Test is contained within DRNSERIES01:NFS_VMware_Test. It then checks if the destination of the snapmirror matches the peerArrayID (i.e. in this case DRNSERIES01) which it does not as the destination, correctly, is NSERIES01 and then reports that the peerArrayID is incorrect. If there is no match on the local-filer-name:volume-name in the source of the snapmirror then it goes on to check the destination of the snapmirrors and when it finds a match it check if the peerArrayID matches the source of the SnapMirror and if it does it then checks that the status of the SnapMirror is broken-off.

I never hit the issue with the first reprotect because DRNSERIES01:NFS_VMware_Test is not contained within the source of the SnapMirror (NSERIES01:NFS_VMware_Test) and therefore it goes on to the next test of checking for DRNSERIES01:NFS_VMware_Test in the destination of the SnapMirror, which it finds and then checks DRNSERIES01 against the destination that also matches and finally confirms that the SnapMirror relationship is broken-off.

I had changed the volume on DRNSERIES01 a while ago because I thought the issue may have been due to the volume names being the same but I had changed it by putting a suffix of _Repl on the end and therefore the script was still matching NSERIES01:NFS_VMware_Test to DRNSERIES01:NFS_VMware_Test_Repl.

I have now configured my test group as follows:

Protected Site
Filer Name = NSERIES01
Volume Name = NFS_VMware_Test_HMR

Recovery Site
File Name = DRNSERIES01
Volume Name = NFS_VMware_Test_EWC 

I can now recover to the Recovery Site, Reprotect, Fail-Back, Reprotect and Fail-over again and continue performing recoveries and reprotect over and over again as often as you can re-record on a Scotch VHS tape!

If the filer on Site-B had a suffix on its name instead of a prefix, e.g. it was named NSERIES01DR, or had a completely different name then I would never have hit this bug in the SRA.  I will be waiting for NetApp to fix the SRA.  In the meantime I will be renaming all of my volumes at the recovery site so that to avoid this issue.

UPDATE FROM VAUGHN STEWART: This is a known issue and will be fixed in a SRA 2.1.x release currently undergoing VMware certification.

Posted in IBM, N series, NetApp, Site Recovery Manager, Storage, VMware | 10 Comments

Upgrading VMware vCenter from v5.1 to v5.1 Update 1 Multi-Site SSO

I have recently upgraded a VMware vCenter 5.1 with Multi-Site Single Sign On from version 5.1 to version 5.1 update 1. This is the process I used and some observations.

I upgrade one site completely first and left it running on the new version for a week before upgrading the other site.

Because the environment had Single Sign On running in a multi-site configuration I did NOT use the “Simple Install”.

The vCenter servers were running as virtual machines so I found out which ESXi host they were running on and then used the VMware vSphere Client to connect directly to the ESXi host the vCenter server was running on. I could then attach the VMware vCenter 5.1U1 ISO to the vCenter server from my local disk.

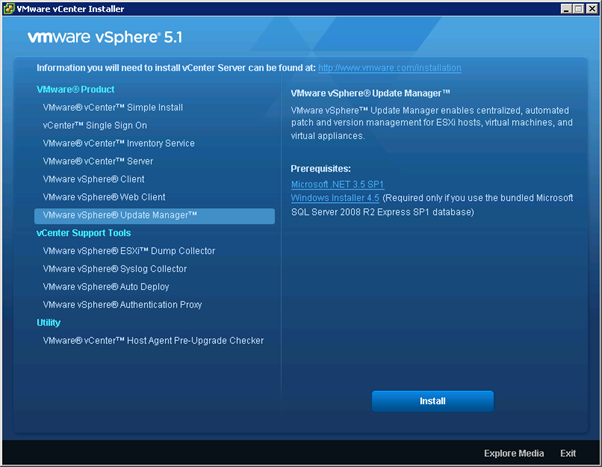
I ran autorun.exe from the CD which displayed the following menu.

I then just working through each of the individual installers (at each site all of these were installed on the same server), i.e.

  1. vCenter Single Sign On
  2. VMware vCenter Inventory Service
  3. VMware vCenter Server
  4. VMware vSphere Client
  5. VMware vSphere Web Client
  6. VMware vSphere Update Manager

When installing vCenter Singe Sign On you will be prompted for the Single Sign On admin password, i.e. the password for admin@SYSTEM-DOMAIN, so make sure you know this before performing the upgrade. A reboot of the server will be required following this install.

When installing the VMware vCenter Inventory Service the installer window disappears, just be patient as it does re-appear again after a few minutes. Don’t try running another installer!

When installing the VMware vCenter Server, if the DSN for the vCenter Database uses Windows Authentication then you need to be logged on to the server as a user with access to the database. The first time I run the VMware vCenter Server installation I was logged on as the local administrator that did not have access to the database and the installation did not work.

When installing VMware vSphere Update Manager you need to enter the password for the user the VMware vSphere Update Manager Service runs as so make sure you know this before performing the upgrade.

The VMware vSphere Client was installed on the server so I upgraded this also.

What I noticed was that after I had upgraded the first server I could still access it with my existing vSphere Client (v5.1.0 build 941893), I was expecting to be prompted to upgrade it. I however did manually upgrade it by running the VMware-viclient.exe from the v5.1U1 ISO. This upgraded my vSphere Client to v5.1.0 build 1064113.

I had to upgrade the Update Manager plug-in within the vSphere Client.

This completed the upgrade of the first server. I left this a week running in a mixed version without any issues and then repeating the tasks on the second site a week later. The build number of the upgraded server was 5.1.0 1064983. Note there is an issue with this build with logging on if you have multiple domains and you are a member of more than 19 groups. A later build is now available, listed as v5.1U1a, that fixes this issue.

Before upgrading either server I took a backup of the server, the environment used IBM N series (rebadged NetApp) storage and had the Virtual Storage Console installed so I used this to take a snapshot of the Datastore the server used. I also backed up the vCenter, SSO and Update Manager SQL databases using SnapManager for SQL before the upgrades.

The environment had Virtual Storage Console (VSC) v4.1 installed and this has been working fine with vCenter 5.1U1. From memory I had to upgrade VSC from v4.0 to v4.1 when upgrading vCenter from v4.1 to v5.1, so if you are already running vCenter 5.1 and have the IBM/NetApp VSC then you should already be on VSC v4.1.

Once I had both servers upgraded to vCenter v5.1U1 I upgraded vCenter Operations Manager from v5.6 to v5.7. This has been working OK as v5.6 with the first server upgraded to vCenter v5.1U1 when using a web browser directly to the vCenter Operations Manager UI but when using it via the VMware vSphere Client I was receiving some script errors. This still appears to be an issue after the upgrade to v5.7.

Posted in Installation, VMware, vSphere | Leave a comment

Warning – vSphere 5 with NetApp NFS Storage

For those of you using NetApp, or IBM N series, NFS storage with VMware vSphere 5 or looking to upgrade to vSphere 5 with NetApp NFS storage beware of a NetApp bug causing the ESXi hosts to lose connection to the NFS datastores.

There is a bug in the NetApp Data ONTAP code causing NFS clients, including VMware vSphere 5, to loose connection to the NFS exports under heavy load. It appears to affect the lower end NetApp FAS systems and vSphere 5. I am not sure if the problem occurs with vSphere 4 or not, it may only be vSphere 5 due to a larger number of asynchronous requests being sent with vSphere 5.

I have witnessed this happen a number of times now. The first thing you notice is that the NFS datastores on the NetApp controller under heavy load are grayed out in the vSphere Client and all of the virtual machines on these datastores stop responding. After a few minutes the datastores come back and hopefully your virtual machines continue as if nothing has happened, although I have had issues with Microsoft SQL services stopping and IBM Domino servers hanging as well as other applications crashing. One other side effect I have seen with this is that any virtual machine that was powered off and stored on one of the affected datastores is shown in the vCenter inventory grayed out and (inaccessible) once the datastores come back on line. This symptom is described in Matt Vogt blog http://blog.mattvogt.net/2013/02/08/vms-grayed-out-after-nfs-datastore-restored/, see his second screen shot for an example.

There are a couple of workarounds for this issue as detailed in the VMware KB article http://kb.vmware.com/selfservice/microsites/search.do?language=en_US&cmd=displayKC&externalId=2016122 and the following NetApp Bug notices: –

NetApp Director Vaughn Stewart bogged about this problem earlier in the year, see http://virtualstorageguy.com/2013/02/08/heads-up-avoiding-vmware-vsphere-esxi-5-nfs-disconnect-issues/

The bug has been fixed in the following versions of Data ONTAP

  • 7.3 stream – 7.3.7P
  • 8.0 stream – 8.0.5
  • 8.1 stream – 8.1.2P4
  • 8.2 stream – 8.2RC1

Vaughn’s blog above suggested that the bug would be fixed in the 8.1.3 release which at the time of publication of this blog had not been released, however the bug notice for 321428 states that it was fixed in 8.1.2P4.

Therefore if you are already running vSphere 5 with NetApp NFS storage I would suggest that you upgrade to one of the version of Data ONTAP with this bug fixed. If you are planning to upgrade to vSphere 5 and you use NFS storage then I suggest you ensure you are running one of the versions of Data ONTAP listed above or later before upgrading your ESXi servers.

You can tell if you have experienced this issue by looking for messages similar to the following in /var/log/vmkwarning.log

Lost connection to the server <NFS-Server-IP-Address> mount point /vol/<NFS-Volume>, mounted as <datastore-id> (“<datastore-name>”)

e.g.

Lost connection to the server 10.10.0.50 mount point /vol/VMware-Datastore01, mounted as bf7ce3db-42c081a2-0000-000000000000 (“Datastore01”)

From the ESXi command line you can use grep to find these messages, e.g.

grep “Lost connection to the server” /var/log/vmkwarning.log

Although you may have lost connection for another reason.

Posted in NetApp, Storage, VMware, vSphere | Leave a comment

PowerShell Script to list NetApp LUNs Mapped to Igroups

I wanted to get a list of which LUNs on my NetApp filer were mapped to each igroup. This script is not very efficient but it gets the job done in the format I wanted it in.

Using Windows PowerShell with the NetApp Data ONTap Module loaded and already connected to the filer I wanted to report against (using Connect-NaController) fist off I got a list of igroups and saved them into an array, i.e.

$igroups = Get-Naigroup

Then I created an object with the properties I wanted to collect using the following syntax

$output = “” | Select igroup, LUNid, Path

Then for each object in the $igroups array I had collected I ran Get-NaLUNbyigroup for each of the LUN ids 0 through to 255. I used the –ErrorAction:SilentlyContinue common parameter to hide the error messages for the LUN ids not mapped to the igroup. I collected the information I wanted in the $output object and then outputted the contents of this object. The commands looked like

Foreach ($igroup in $igroups) {

for ($lunid=0; $lunid -le 255; $lunid++) {

$output.igroup = $igroup.InitiatorGroupName

$output.LUNid = $lunid

$output.Path = get-nalunbyigroup $igroup.InitiatorGroupName $lunid -ErrorAction:SilentlyContinue

$output

}

}

Posted in NetApp, Powershell | 2 Comments

PowerShell Script to report on LUNs mapped to IGroups

I had a requirement to produce a report of which of my NetApp LUNs were mapped to which of my 3 VMware vSphere clusters. Each cluster has its own Igroup on the NetApp filer: –

  • Prod-Cluster
  • Dev-Cluster
  • UAT-Cluster

Some LUNs are mapped to more than one cluster.

Using PowerShell with the Data ONTap module installed I could get a list of LUNs with

Get-NaLun

I could then filter this to just the ones that are mapped with

Get-NaLun | Where {$_.Mapped}

I collected the results of the above command into an array named $MappedLUNs, i..e

$MappedLUNs = Get-NaLun | Where {$_.Mapped}

I then setup an object with the property names I wanted to report on, by using a trick I learned from Hal Rottenberg by piping “” to the select commandlet, i.e.

$LUNMap = “” | Select LUN, Prod-Cluster, Test-Cluster, UAT-Cluster

Then for each of the objects in the $MappedLUNs array I got the LUN path and then using Get-NaLUNMap I obtained the LUNID property where the Initiator Group Name equalled each of the Igroups I was interested in, i.e.

ForEach ($LUN in $MappedLUNs) {
$LUNMap.LUN = $lun.path
$LUNMap.Prod-Cluster = (Get-NaLUNMap $LUN | Where {$_.InitiatorGroupName -eq “Prod-Cluster”}).LUNID
$LUNMap.Test-Cluster = (Get-NaLUNMap $LUN | Where {$_.InitiatorGroupName -eq “Test-Cluster}).LUNID
$LUNMap.UAT-Cluster = (Get-NaLUNMap $LUN | Where {$_.InitiatorGroupName -eq “UAT-Cluster”}).LUNID
$LUNMap
}

I saved all of these commands into a script file named Get-LUNMap.ps1 and piped the output through Export-CSV to get the results into a CSV file which I could load up into Microsoft Excel to perform some formatting, sorting and analysis, i.e.

Get-LUNMap.ps1 | Export-CSV lunmap.csv

Posted in NetApp, Powershell, vSphere | Leave a comment